RecyclerView源码解析

RecyclerView 可以让您轻松高效地显示大量数据。您提供数据并定义每个列表项的外观,而 RecyclerView 库会根据需要动态创建元素。

顾名思义,RecyclerView 会回收这些单个的元素。当列表项滚动出屏幕时,RecyclerView 不会销毁其视图。相反,RecyclerView 会对屏幕上滚动的新列表项重用该视图。这种重用可以显著提高性能,改善应用响应能力并降低功耗。

详细使用方法请参照开发者文档😃

关键类

类定义

1
2
3
4
public class RecyclerView extends ViewGroup implements ScrollingView,
NestedScrollingChild2, NestedScrollingChild3 {
...
}

可以看出RecyclerView继承于ViewGroup,本身也是一个自定义View,实现了ScrollingView等接口。

绘制过程

本质上是自定义View,则有onMeasure、onLayout、onDraw三步绘制过程。

onMeasure

自定义View的onMeausre 的具体逻辑,在这里,依然可以做个参考:

  1. super.onMeasure 会先计算自定义 view 的大小;
  2. 调用 measureChild 对子 View 进行测量;
  3. 自定义 view 设置的宽高参数不是 MeasureSpec.EXACTLY 的话,对于子 View 是 match_parent 需要额外处理,同时也需要对 MeasureSpec.AT_MOST 情况进行额外处理。
  4. 当自定义View 的大小确定后,在对子 View 是 match_parent 重新测量;

在RecyclerView的onMeasure中有三种情况:

1
2
3
4
5
6
7
8
9
10
protected void onMeasure(int widthSpec, int heightSpec) {
if (mLayout == null) {
// 情况1
}

if (mLayout.mAutoMeasure) {
// 情况2
} else {
// 情况3
}
  1. mLayout==null mLayout LayoutManager 的对象。我们知道,当 RecyclerView LayoutManager 为空时,RecyclerView 不能显示任何的数据,在这里我们找到答案。
  2. LayoutManager 开启了自动测量时,这是一种情况。在这种情况下,有可能会测量两次。
  3. 第三种情况就是没有开启自动测量的情况,这种情况比较少,因为 RecyclerView 为了支持 warp_content 属性,系统提供的 LayoutManager 都开启自动测量的,不过还是要分析的。

情况一

1
2
3
4
if (mLayout == null) {
defaultOnMeasure(widthSpec, heightSpec);
return;
}

这里调用了defaultOnMeasure方法。

1
2
3
4
5
6
7
8
9
10
11
12
13
14
15
16
/**
* An implementation of {@link View#onMeasure(int, int)} to fall back to in various scenarios
* where this RecyclerView is otherwise lacking better information.
*/
void defaultOnMeasure(int widthSpec, int heightSpec) {
// calling LayoutManager here is not pretty but that API is already public and it is better
// than creating another method since this is internal.
final int width = LayoutManager.chooseSize(widthSpec,
getPaddingLeft() + getPaddingRight(),
ViewCompat.getMinimumWidth(this));
final int height = LayoutManager.chooseSize(heightSpec,
getPaddingTop() + getPaddingBottom(),
ViewCompat.getMinimumHeight(this));

setMeasuredDimension(width, height);
}

该方法中通过LayoutManager.choose()方法来计算宽高值,然后调用setMeasuredDimension()设置宽高

1
2
3
4
5
6
7
8
9
10
11
12
13
14
15
16
17
18
19
20
21
22
23
/**
* Chooses a size from the given specs and parameters that is closest to the desired size
* and also complies with the spec.
*
* @param spec The measureSpec
* @param desired The preferred measurement
* @param min The minimum value
*
* @return A size that fits to the given specs
*/
public static int chooseSize(int spec, int desired, int min) {
final int mode = View.MeasureSpec.getMode(spec);
final int size = View.MeasureSpec.getSize(spec);
switch (mode) {
case View.MeasureSpec.EXACTLY:
return size;
case View.MeasureSpec.AT_MOST:
return Math.min(size, Math.max(desired, min));
case View.MeasureSpec.UNSPECIFIED:
default:
return Math.max(desired, min);
}
}

chooseSize方法就是通过RecyclerView的不同测量模式来选取不同的值。这里没有测量子 view 的大小,这也是白屏的原因。因为 RecyclerView 的绘制其实是委托给 LayoutManager 来管理,LayoutManager = null 的情况下测量子 view 没有任何的意义。

情况二

1
2
3
4
5
6
7
8
9
10
11
12
13
14
15
16
17
18
19
20
21
22
23
24
25
26
27
28
29
30
31
32
33
34
35
36
37
38
39
40
41
if (mLayout.isAutoMeasureEnabled()) {
//先获取测量模式
final int widthMode = MeasureSpec.getMode(widthSpec);
final int heightMode = MeasureSpec.getMode(heightSpec);

//调用LayoutManager.onMeasure方法测量
mLayout.onMeasure(mRecycler, mState, widthSpec, heightSpec);
//判断是否可以跳过测量或者adapter为null,直接返回。
/*自定义 view 设置的宽高参数不是 MeasureSpec.EXACTLY 的话,对于子 View 是 match_parent 需要额外处理。*/
final boolean measureSpecModeIsExactly =
widthMode == MeasureSpec.EXACTLY && heightMode == MeasureSpec.EXACTLY;
if (measureSpecModeIsExactly || mAdapter == null) {
return;
}
//开始测量
if (mState.mLayoutStep == State.STEP_START) {
dispatchLayoutStep1();
}
// set dimensions in 2nd step. Pre-layout should happen with old dimensions for
// consistency
mLayout.setMeasureSpecs(widthSpec, heightSpec);
mState.mIsMeasuring = true;
dispatchLayoutStep2();

// now we can get the width and height from the children.
mLayout.setMeasuredDimensionFromChildren(widthSpec, heightSpec);

// if RecyclerView has non-exact width and height and if there is at least one child
// which also has non-exact width & height, we have to re-measure.
//第二次
if (mLayout.shouldMeasureTwice()) {
mLayout.setMeasureSpecs(
MeasureSpec.makeMeasureSpec(getMeasuredWidth(), MeasureSpec.EXACTLY),
MeasureSpec.makeMeasureSpec(getMeasuredHeight(), MeasureSpec.EXACTLY));
mState.mIsMeasuring = true;
dispatchLayoutStep2();
// now we can get the width and height from the children.
mLayout.setMeasuredDimensionFromChildren(widthSpec, heightSpec);

}
}

这种情况下,首先调用LayoutManager.onMeasure方法测量,但是Android官方的三种LayoutManager(LinearLayoutManager、GridLayoutManager、StaggeredGridLayoutManager)都没有复写此方法,此方法源码:

1
2
3
public void onMeasure(Recycler recycler, State state, int widthSpec, int heightSpec) {
mRecyclerView.defaultOnMeasure(widthSpec, heightSpec);
}

这是自定义View的onMeasure步骤中的测量自己本身的大小。

接下来判断mState.mLayoutStep这个变量,即当前绘制状态,如果为State.STEP_START,那么便会执行dispatchLayoutStep1方法,随后又调用了dispatchLayoutStep2方法,最后如果需要二次测量的话,那么会再调用一次dispatchLayoutStep2方法。

我们先来分别看一下mState.mLayoutStep变量的含义和dispatchLayoutStepX系列方法的作用。

o4M6D1.jpg

o4MIvd.jpg

1
2
3
4
5
6
7
8
9
10
11
12
13
14
15
16
17
18
19
20
21
22
23
24
25
26
27
28
29
30
31
32
33
34
35
36
37
38
39
40
private void dispatchLayoutStep1() {
//这里还用到了断言
mState.assertLayoutStep(State.STEP_START);
fillRemainingScrollValues(mState);
mState.mIsMeasuring = false;
startInterceptRequestLayout();
mViewInfoStore.clear();
onEnterLayoutOrScroll();
//处理adapter更新
processAdapterUpdatesAndSetAnimationFlags();
saveFocusInfo();
mState.mTrackOldChangeHolders = mState.mRunSimpleAnimations && mItemsChanged;
mItemsAddedOrRemoved = mItemsChanged = false;
mState.mInPreLayout = mState.mRunPredictiveAnimations;
mState.mItemCount = mAdapter.getItemCount();
findMinMaxChildLayoutPositions(mMinMaxLayoutPositions);

//是否要运行动画
if (mState.mRunSimpleAnimations) {
// Step 0: Find out where all non-removed items are, pre-layout
// 找出所有未移除的ItemView,进行预布局
......
}
if (mState.mRunPredictiveAnimations) {
// Step 1: run prelayout: This will use the old positions of items. The layout manager
// is expected to layout everything, even removed items (though not to add removed
// items back to the container). This gives the pre-layout position of APPEARING views
// which come into existence as part of the real layout.

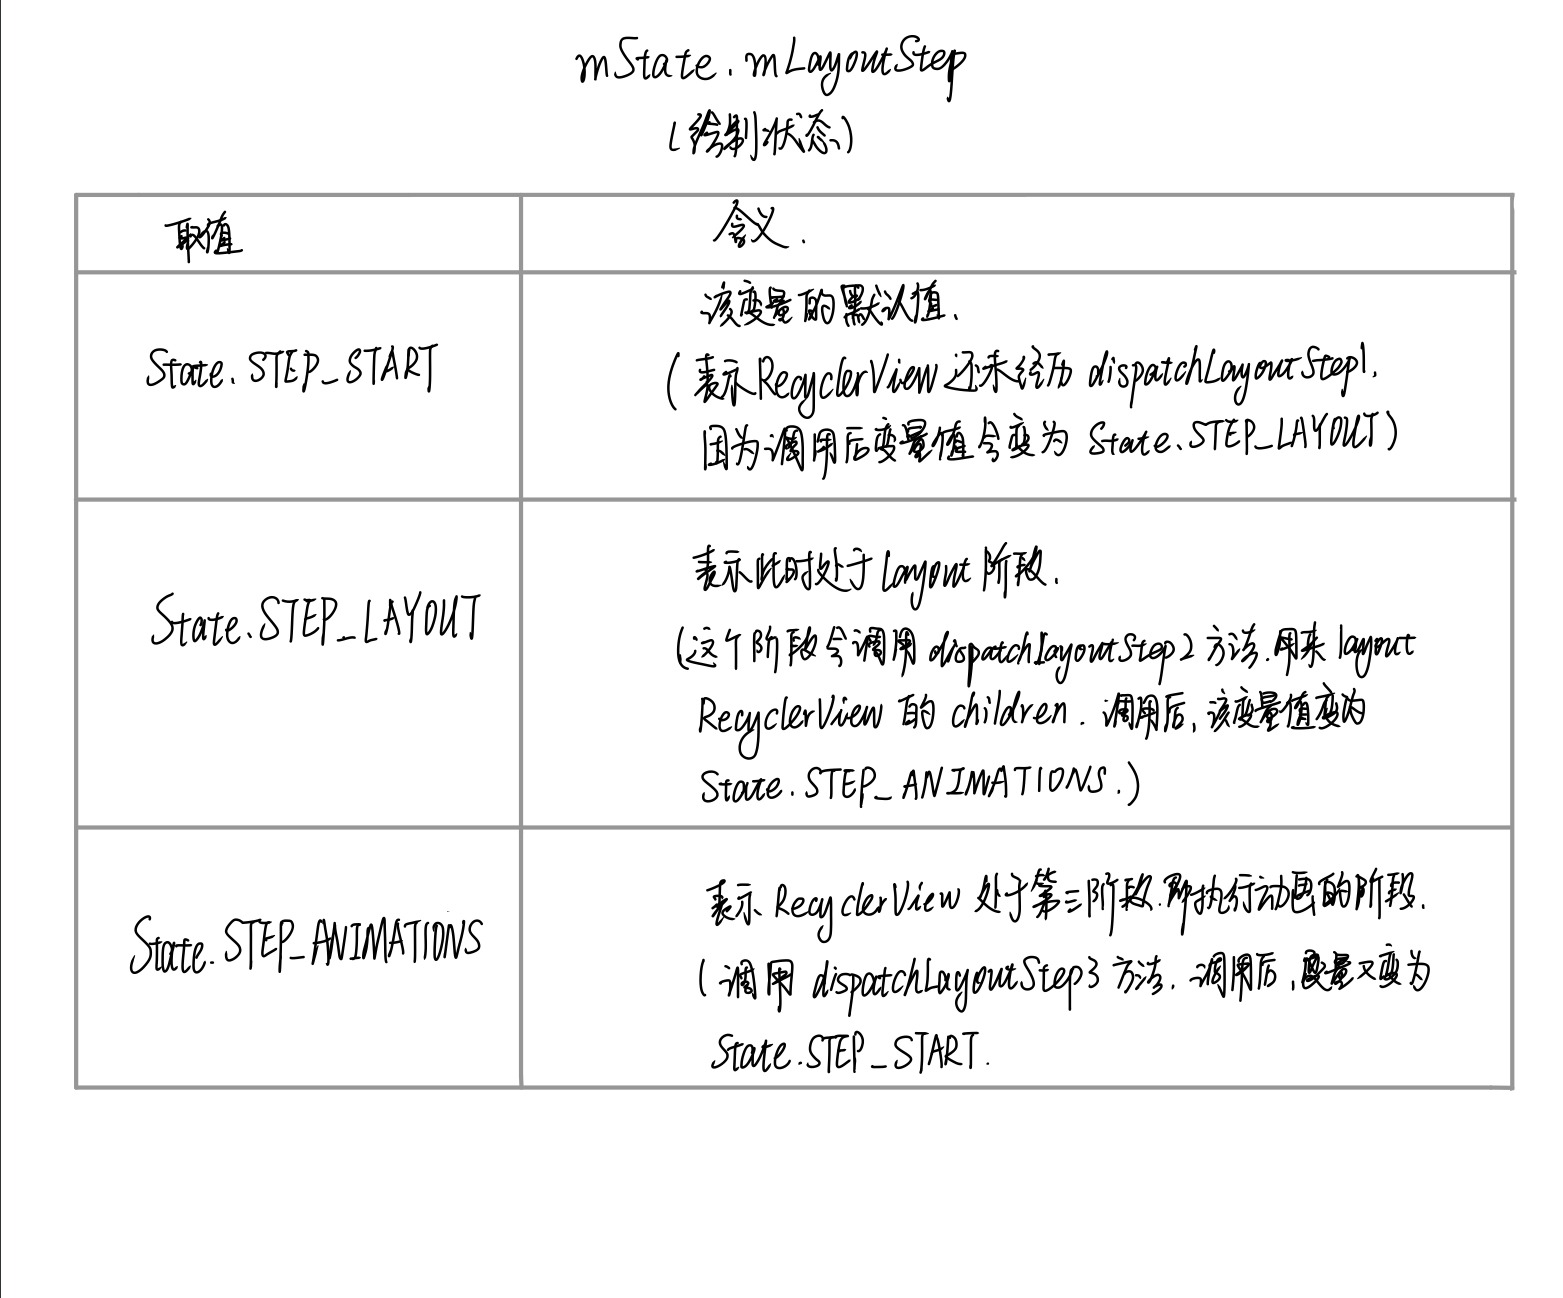
// Save old positions so that LayoutManager can run its mapping logic.
//保存旧状态进行预布局。
......
} else {
clearOldPositions();
}
onExitLayoutOrScroll();
stopInterceptRequestLayout(false);
//改变状态
mState.mLayoutStep = State.STEP_LAYOUT;
}

可以看到dispatchLayoutStep1方法主要是根据mState.mRunPredictiveAnimationsmState.mRunPredictiveAnimations两个值做出相应的逻辑处理。而在processAdapterUpdatesAndSetAnimationFlags方法中,计算了这两个值:

1
2
3
4
5
6
7
8
9
10
11
12
13
14
15
16
private void processAdapterUpdatesAndSetAnimationFlags() {

...

mState.mRunSimpleAnimations = mFirstLayoutComplete
&& mItemAnimator != null
&& (mDataSetHasChangedAfterLayout
|| animationTypeSupported
|| mLayout.mRequestedSimpleAnimations)
&& (!mDataSetHasChangedAfterLayout
|| mAdapter.hasStableIds());
mState.mRunPredictiveAnimations = mState.mRunSimpleAnimations
&& animationTypeSupported
&& !mDataSetHasChangedAfterLayout
&& predictiveItemAnimationsEnabled();
}

这里我们关注一下mFirstLayoutComplete变量,我们发现mRunSimpleAnimations的值与mFirstLayoutComplete有关,mRunPredictiveAnimations同时跟mRunSimpleAnimations有关。第一次绘制流程还未完成,mFirstLayoutComplete==false所以mRunSimpleAnimations = mRunPredictiveAnimations == false,当RecyclerView第一次加载数据时,是不会执行动画的。每个ItemView还没有layout完毕,是不会进行动画的。

接下来,我们看dispatchLayoutStep2方法,其中,对RecyclerView的子View进行了Layout:

1
2
3
4
5
6
7
8
9
10
11
12
13
14
15
16
17
18
19
20
21
22
23
24
private void dispatchLayoutStep2() {
startInterceptRequestLayout();
onEnterLayoutOrScroll();
mState.assertLayoutStep(State.STEP_LAYOUT | State.STEP_ANIMATIONS);
mAdapterHelper.consumeUpdatesInOnePass();
//1
mState.mItemCount = mAdapter.getItemCount();
mState.mDeletedInvisibleItemCountSincePreviousLayout = 0;

// Step 2: Run layout
mState.mInPreLayout = false;
//2
mLayout.onLayoutChildren(mRecycler, mState);

mState.mStructureChanged = false;
mPendingSavedState = null;

// onLayoutChildren may have caused client code to disable item animations; re-check
mState.mRunSimpleAnimations = mState.mRunSimpleAnimations && mItemAnimator != null;
//改变状态
mState.mLayoutStep = State.STEP_ANIMATIONS;
onExitLayoutOrScroll();
stopInterceptRequestLayout(false);
}

1、2处可以看到,对children进行了测量和布局。

LayoutManageronLayoutChildren方法是一个空方法,所以需要LayoutManager的子类自己实现。

1
2
3
public void onLayoutChildren(Recycler recycler, State state) {
Log.e(TAG, "You must override onLayoutChildren(Recycler recycler, State state) ");
}
onLayoutChildren

RecyclerView将View的绘制交给了LayoutManager。将RecyclerView内部持有的Recyclerstate传给了LayoutManageronLayoutChildren方法。这里我们分析LinearLayoutManager

大概流程:

  • 确定锚点信息,包括:1.Children的布局方向,有start和end两个方向。2.mPositionmCoordinate,分别表示Children开始填充的position和坐标。
  • 调用detachAndScrapAttachedViews方法,detach掉或者removeRecyclerViewChildren。(与缓存机制相关)
  • 根据锚点信息,调用fill方法进行Children的填充。根据锚点信息的不同,可能会调用两次fill方法。
1
2
3
4
5
6
7
8
9
10
11
12
13
14
15
16
17
18
19
20
21
22
23
24
25
26
27
28
29
30
31
32
33
34
35
36
37
38
39
40
41
42
43
44
45
46
47
48
49
50
51
52
53
54
55
56
57
58
59
60
61
62
63
64
65
66
67
68
69
70
71
72
73
74
75
76
77
78
79
80
81
82
83
84
85
86
87
88
89
90
91
92
93
94
95
96
@Override
public void onLayoutChildren(RecyclerView.Recycler recycler, RecyclerView.State state) {
// 第一步找寻锚点
// 两个方向填充,从锚点往上和锚点往下
// 判断绘制方向,给mShouldReverseLayout赋值,默认是正向绘制,则mShouldReverseLayout是False
...

// resolve layout direction
resolveShouldLayoutReverse();

final View focused = getFocusedChild();
// mValid 的默认值是false,一次测量之后设为true,onLayout 完成后会回调执行reset方法,又变为false
if (!mAnchorInfo.mValid || mPendingScrollPosition != RecyclerView.NO_POSITION
|| mPendingSavedState != null) {
// mStackFromEnd默认是false,除非手动调用setStackFromEnd方法,两个都会false,异或为false
mAnchorInfo.reset();
mAnchorInfo.mLayoutFromEnd = mShouldReverseLayout ^ mStackFromEnd;
// calculate anchor position and coordinate
// 计算锚点位置和偏移量。
updateAnchorInfoForLayout(recycler, state, mAnchorInfo);
mAnchorInfo.mValid = true;
} else if (focused != null && (mOrientationHelper.getDecoratedStart(focused)
>= mOrientationHelper.getEndAfterPadding()
|| mOrientationHelper.getDecoratedEnd(focused)
<= mOrientationHelper.getStartAfterPadding())) {

mAnchorInfo.assignFromViewAndKeepVisibleRect(focused, getPosition(focused));
}
//第二步
detachAndScrapAttachedViews(recycler);
mLayoutState.mInfinite = resolveIsInfinite();
mLayoutState.mIsPreLayout = state.isPreLayout();

...
//mLayoutFromEnd为false
if (mAnchorInfo.mLayoutFromEnd) {
// 第三步
// 倒着绘制的话,先往上绘制,再往下绘制
// fill towards start
// 从锚点到往上
updateLayoutStateToFillStart(mAnchorInfo);
...
fill(recycler, mLayoutState, state, false);

// fill towards end
// 从锚点到往下
updateLayoutStateToFillEnd(mAnchorInfo);
...
//调两遍fill方法
fill(recycler, mLayoutState, state, false);
...

if (mLayoutState.mAvailable > 0) {
// end could not consume all. add more items towards start
...
updateLayoutStateToFillStart(firstElement, startOffset);
mLayoutState.mExtraFillSpace = extraForStart;
fill(recycler, mLayoutState, state, false);
...
}
} else {
// fill towards end
// 正常绘制流程的话,先往下绘制,再往上绘制
updateLayoutStateToFillEnd(mAnchorInfo);
...
fill(recycler, mLayoutState, state, false);
...
// fill towards start
updateLayoutStateToFillStart(mAnchorInfo);
...

fill(recycler, mLayoutState, state, false);
...

if (mLayoutState.mAvailable > 0) {
...

// start could not consume all it should. add more items towards end
updateLayoutStateToFillEnd(lastElement, endOffset);
...
fill(recycler, mLayoutState, state, false);
...
}
}

...

layoutForPredictiveAnimations(recycler, state, startOffset, endOffset);
//完成后重置参数
if (!state.isPreLayout()) {
mOrientationHelper.onLayoutComplete();
} else {
mAnchorInfo.reset();
}
mLastStackFromEnd = mStackFromEnd;
}
确定锚点信息

首先执行resolveShouldLayoutReverse方法判断是否需要倒着绘制:

1
2
3
4
5
6
7
8
9
10
private void resolveShouldLayoutReverse() {
// A == B is the same result, but we rather keep it readable
//默认情况下,`mReverseLayout`为false,是不会倒着绘制的。手动调用`setReverseLayout`方法可以改变`mRverseLayout`的值。

if (mOrientation == VERTICAL || !isLayoutRTL()) {
mShouldReverseLayout = mReverseLayout;
} else {
mShouldReverseLayout = !mReverseLayout;
}
}

接下通过updateAnchorInfoForLayout方法来计算锚点信息。

锚点:

1
2
3
4
5
6
7
8
9
static class AnchorInfo {
OrientationHelper mOrientationHelper;
int mPosition; //position
int mCoordinate; //坐标
boolean mLayoutFromEnd; //mLayoutFromEnd = mShouldReverseLayout ^ mStackFromEnd
boolean mValid; //默认false,一次测量后设为true,onLayout后回调reset,重置为false
...

}
1
2
3
4
5
6
7
8
9
10
11
12
13
14
private void updateAnchorInfoForLayout(RecyclerView.Recycler recycler, RecyclerView.State state,
AnchorInfo anchorInfo) {
//第一种计算方法
if (updateAnchorFromPendingData(state, anchorInfo)) {
return;
}
//第二种计算方法
if (updateAnchorFromChildren(recycler, state, anchorInfo)) {
return;
}
//第三种计算方法
anchorInfo.assignCoordinateFromPadding();
anchorInfo.mPosition = mStackFromEnd ? state.getItemCount() - 1 : 0;
}
  • 第一种:1.RecyclerView被重建,期间调用了onSaveInstanceState方法,目的是为了恢复上次的布局。2.RecyclerView调用了scrollToPosition之类的方法,目的是让RecyclerView滚到准确的位置上去。
  • 第二种:根据子View来更新锚点信息,如果一个子View有焦点,则根据其来计算锚点信息;如果没有焦点,则根据布局方向选取可见的第一个ItemView或最后一个ItemView
  • 第三种:前两种都未采用。

情况三

1
2
3
4
5
6
7
8
9
10
11
12
13
14
15
16
17
18
19
20
21
22
23
24
25
26
27
28
29
30
31
32
33
34
35
36
37
38
39
40
41
42
43
44
45
46
47
48
49
50
51
52
53
54
55
56
57
58
59
60
61
62
63
64
65
66
67
68
69
70
71
72
73
74
75
76
77
78
79
80
81
82
83
84
85
86
87
88
89
90
91
92
93
94
95
96
97
98
99
100
101
102
103
104
105
106
107
108
109
110
111
112
113
114
115
116
117
118
119
120
121
122
123
124
125
126
127
128
129
130
131
132
133
134
135
136
137
138
139
140
141
142
143
144
145
146
147
148
149
150
151
152
153
154
155
156
157
158
159
160
161
162
163
164
165
166
167
168
169
170
171
172
173
174
175
176
177
178
179
180
181
182
183
184
185
186
187
188
189
190
191
192
193
194
195
196
197
198
199
200
201
202
203
204
205
206
207
208
209
210
211
212
213
214
215
216
217
218
219
220
221
222
223
224
225
226
227
228
229
230
231
232
233
234
235
236
237
else {
if (mHasFixedSize@Override
public void onLayoutChildren(RecyclerView.Recycler recycler, RecyclerView.State state) {
// layout algorithm:
// 1) by checking children and other variables, find an anchor coordinate and an anchor
// item position.
// 2) fill towards start, stacking from bottom
// 3) fill towards end, stacking from top
// 4) scroll to fulfill requirements like stack from bottom.
// create layout state
if (DEBUG) {
Log.d(TAG, "is pre layout:" + state.isPreLayout());
}
if (mPendingSavedState != null || mPendingScrollPosition != RecyclerView.NO_POSITION) {
if (state.getItemCount() == 0) {
removeAndRecycleAllViews(recycler);
return;
}
}
if (mPendingSavedState != null && mPendingSavedState.hasValidAnchor()) {
mPendingScrollPosition = mPendingSavedState.mAnchorPosition;
}

ensureLayoutState();
mLayoutState.mRecycle = false;
// resolve layout direction
resolveShouldLayoutReverse();

final View focused = getFocusedChild();
if (!mAnchorInfo.mValid || mPendingScrollPosition != RecyclerView.NO_POSITION
|| mPendingSavedState != null) {
mAnchorInfo.reset();
mAnchorInfo.mLayoutFromEnd = mShouldReverseLayout ^ mStackFromEnd;
// calculate anchor position and coordinate
updateAnchorInfoForLayout(recycler, state, mAnchorInfo);
mAnchorInfo.mValid = true;
} else if (focused != null && (mOrientationHelper.getDecoratedStart(focused)
>= mOrientationHelper.getEndAfterPadding()
|| mOrientationHelper.getDecoratedEnd(focused)
<= mOrientationHelper.getStartAfterPadding())) {
// This case relates to when the anchor child is the focused view and due to layout
// shrinking the focused view fell outside the viewport, e.g. when soft keyboard shows
// up after tapping an EditText which shrinks RV causing the focused view (The tapped
// EditText which is the anchor child) to get kicked out of the screen. Will update the
// anchor coordinate in order to make sure that the focused view is laid out. Otherwise,
// the available space in layoutState will be calculated as negative preventing the
// focused view from being laid out in fill.
// Note that we won't update the anchor position between layout passes (refer to
// TestResizingRelayoutWithAutoMeasure), which happens if we were to call
// updateAnchorInfoForLayout for an anchor that's not the focused view (e.g. a reference
// child which can change between layout passes).
mAnchorInfo.assignFromViewAndKeepVisibleRect(focused, getPosition(focused));
}
if (DEBUG) {
Log.d(TAG, "Anchor info:" + mAnchorInfo);
}

// LLM may decide to layout items for "extra" pixels to account for scrolling target,
// caching or predictive animations.

mLayoutState.mLayoutDirection = mLayoutState.mLastScrollDelta >= 0
? LayoutState.LAYOUT_END : LayoutState.LAYOUT_START;
mReusableIntPair[0] = 0;
mReusableIntPair[1] = 0;
calculateExtraLayoutSpace(state, mReusableIntPair);
int extraForStart = Math.max(0, mReusableIntPair[0])
+ mOrientationHelper.getStartAfterPadding();
int extraForEnd = Math.max(0, mReusableIntPair[1])
+ mOrientationHelper.getEndPadding();
if (state.isPreLayout() && mPendingScrollPosition != RecyclerView.NO_POSITION
&& mPendingScrollPositionOffset != INVALID_OFFSET) {
// if the child is visible and we are going to move it around, we should layout
// extra items in the opposite direction to make sure new items animate nicely
// instead of just fading in
final View existing = findViewByPosition(mPendingScrollPosition);
if (existing != null) {
final int current;
final int upcomingOffset;
if (mShouldReverseLayout) {
current = mOrientationHelper.getEndAfterPadding()
- mOrientationHelper.getDecoratedEnd(existing);
upcomingOffset = current - mPendingScrollPositionOffset;
} else {
current = mOrientationHelper.getDecoratedStart(existing)
- mOrientationHelper.getStartAfterPadding();
upcomingOffset = mPendingScrollPositionOffset - current;
}
if (upcomingOffset > 0) {
extraForStart += upcomingOffset;
} else {
extraForEnd -= upcomingOffset;
}
}
}
int startOffset;
int endOffset;
final int firstLayoutDirection;
if (mAnchorInfo.mLayoutFromEnd) {
firstLayoutDirection = mShouldReverseLayout ? LayoutState.ITEM_DIRECTION_TAIL
: LayoutState.ITEM_DIRECTION_HEAD;
} else {
firstLayoutDirection = mShouldReverseLayout ? LayoutState.ITEM_DIRECTION_HEAD
: LayoutState.ITEM_DIRECTION_TAIL;
}

onAnchorReady(recycler, state, mAnchorInfo, firstLayoutDirection);
detachAndScrapAttachedViews(recycler);
mLayoutState.mInfinite = resolveIsInfinite();
mLayoutState.mIsPreLayout = state.isPreLayout();
// noRecycleSpace not needed: recycling doesn't happen in below's fill
// invocations because mScrollingOffset is set to SCROLLING_OFFSET_NaN
mLayoutState.mNoRecycleSpace = 0;
if (mAnchorInfo.mLayoutFromEnd) {
// fill towards start
updateLayoutStateToFillStart(mAnchorInfo);
mLayoutState.mExtraFillSpace = extraForStart;
fill(recycler, mLayoutState, state, false);
startOffset = mLayoutState.mOffset;
final int firstElement = mLayoutState.mCurrentPosition;
if (mLayoutState.mAvailable > 0) {
extraForEnd += mLayoutState.mAvailable;
}
// fill towards end
updateLayoutStateToFillEnd(mAnchorInfo);
mLayoutState.mExtraFillSpace = extraForEnd;
mLayoutState.mCurrentPosition += mLayoutState.mItemDirection;
fill(recycler, mLayoutState, state, false);
endOffset = mLayoutState.mOffset;

if (mLayoutState.mAvailable > 0) {
// end could not consume all. add more items towards start
extraForStart = mLayoutState.mAvailable;
updateLayoutStateToFillStart(firstElement, startOffset);
mLayoutState.mExtraFillSpace = extraForStart;
fill(recycler, mLayoutState, state, false);
startOffset = mLayoutState.mOffset;
}
} else {
// fill towards end
updateLayoutStateToFillEnd(mAnchorInfo);
mLayoutState.mExtraFillSpace = extraForEnd;
fill(recycler, mLayoutState, state, false);
endOffset = mLayoutState.mOffset;
final int lastElement = mLayoutState.mCurrentPosition;
if (mLayoutState.mAvailable > 0) {
extraForStart += mLayoutState.mAvailable;
}
// fill towards start
updateLayoutStateToFillStart(mAnchorInfo);
mLayoutState.mExtraFillSpace = extraForStart;
mLayoutState.mCurrentPosition += mLayoutState.mItemDirection;
fill(recycler, mLayoutState, state, false);
startOffset = mLayoutState.mOffset;

if (mLayoutState.mAvailable > 0) {
extraForEnd = mLayoutState.mAvailable;
// start could not consume all it should. add more items towards end
updateLayoutStateToFillEnd(lastElement, endOffset);
mLayoutState.mExtraFillSpace = extraForEnd;
fill(recycler, mLayoutState, state, false);
endOffset = mLayoutState.mOffset;
}
}

// changes may cause gaps on the UI, try to fix them.
// TODO we can probably avoid this if neither stackFromEnd/reverseLayout/RTL values have
// changed
if (getChildCount() > 0) {
// because layout from end may be changed by scroll to position
// we re-calculate it.
// find which side we should check for gaps.
if (mShouldReverseLayout ^ mStackFromEnd) {
int fixOffset = fixLayoutEndGap(endOffset, recycler, state, true);
startOffset += fixOffset;
endOffset += fixOffset;
fixOffset = fixLayoutStartGap(startOffset, recycler, state, false);
startOffset += fixOffset;
endOffset += fixOffset;
} else {
int fixOffset = fixLayoutStartGap(startOffset, recycler, state, true);
startOffset += fixOffset;
endOffset += fixOffset;
fixOffset = fixLayoutEndGap(endOffset, recycler, state, false);
startOffset += fixOffset;
endOffset += fixOffset;
}
}
layoutForPredictiveAnimations(recycler, state, startOffset, endOffset);
if (!state.isPreLayout()) {
mOrientationHelper.onLayoutComplete();
} else {
mAnchorInfo.reset();
}
mLastStackFromEnd = mStackFromEnd;
if (DEBUG) {
validateChildOrder();
}
}) {
mLayout.onMeasure(mRecycler, mState, widthSpec, heightSpec);
return;
}
// custom onMeasure
if (mAdapterUpdateDuringMeasure) {
startInterceptRequestLayout();
onEnterLayoutOrScroll();
processAdapterUpdatesAndSetAnimationFlags();
onExitLayoutOrScroll();

if (mState.mRunPredictiveAnimations) {
mState.mInPreLayout = true;
} else {
// consume remaining updates to provide a consistent state with the layout pass.
mAdapterHelper.consumeUpdatesInOnePass();
mState.mInPreLayout = false;
}
mAdapterUpdateDuringMeasure = false;
stopInterceptRequestLayout(false);
} else if (mState.mRunPredictiveAnimations) {
// If mAdapterUpdateDuringMeasure is false and mRunPredictiveAnimations is true:
// this means there is already an onMeasure() call performed to handle the pending
// adapter change, two onMeasure() calls can happen if RV is a child of LinearLayout
// with layout_width=MATCH_PARENT. RV cannot call LM.onMeasure() second time
// because getViewForPosition() will crash when LM uses a child to measure.
setMeasuredDimension(getMeasuredWidth(), getMeasuredHeight());
return;
}

if (mAdapter != null) {
mState.mItemCount = mAdapter.getItemCount();
} else {
mState.mItemCount = 0;
}
startInterceptRequestLayout();
mLayout.onMeasure(mRecycler, mState, widthSpec, heightSpec);
stopInterceptRequestLayout(false);
mState.mInPreLayout = false; // clear
}

这里主要做了两件事,最终都会调用LayoutManageronMeasure方法进行测量。

  • 如果mHasFixedSize为true(也就是调用了setHasFixedSize方法),将直接调用LayoutManageronMeasure方法进行测量。
  • 如果为false,同时此时如果有数据更新,则先处理数据更新的事务,然后调用LayoutManageronMeasure方法进行测量。

onLayout

1
2
3
4
5
6
7
@Override
protected void onLayout(boolean changed, int l, int t, int r, int b) {
TraceCompat.beginSection(TRACE_ON_LAYOUT_TAG);
dispatchLayout();// 进行layout操作
TraceCompat.endSection();
mFirstLayoutComplete = true;//赋值为true,即已经layout一次了
}
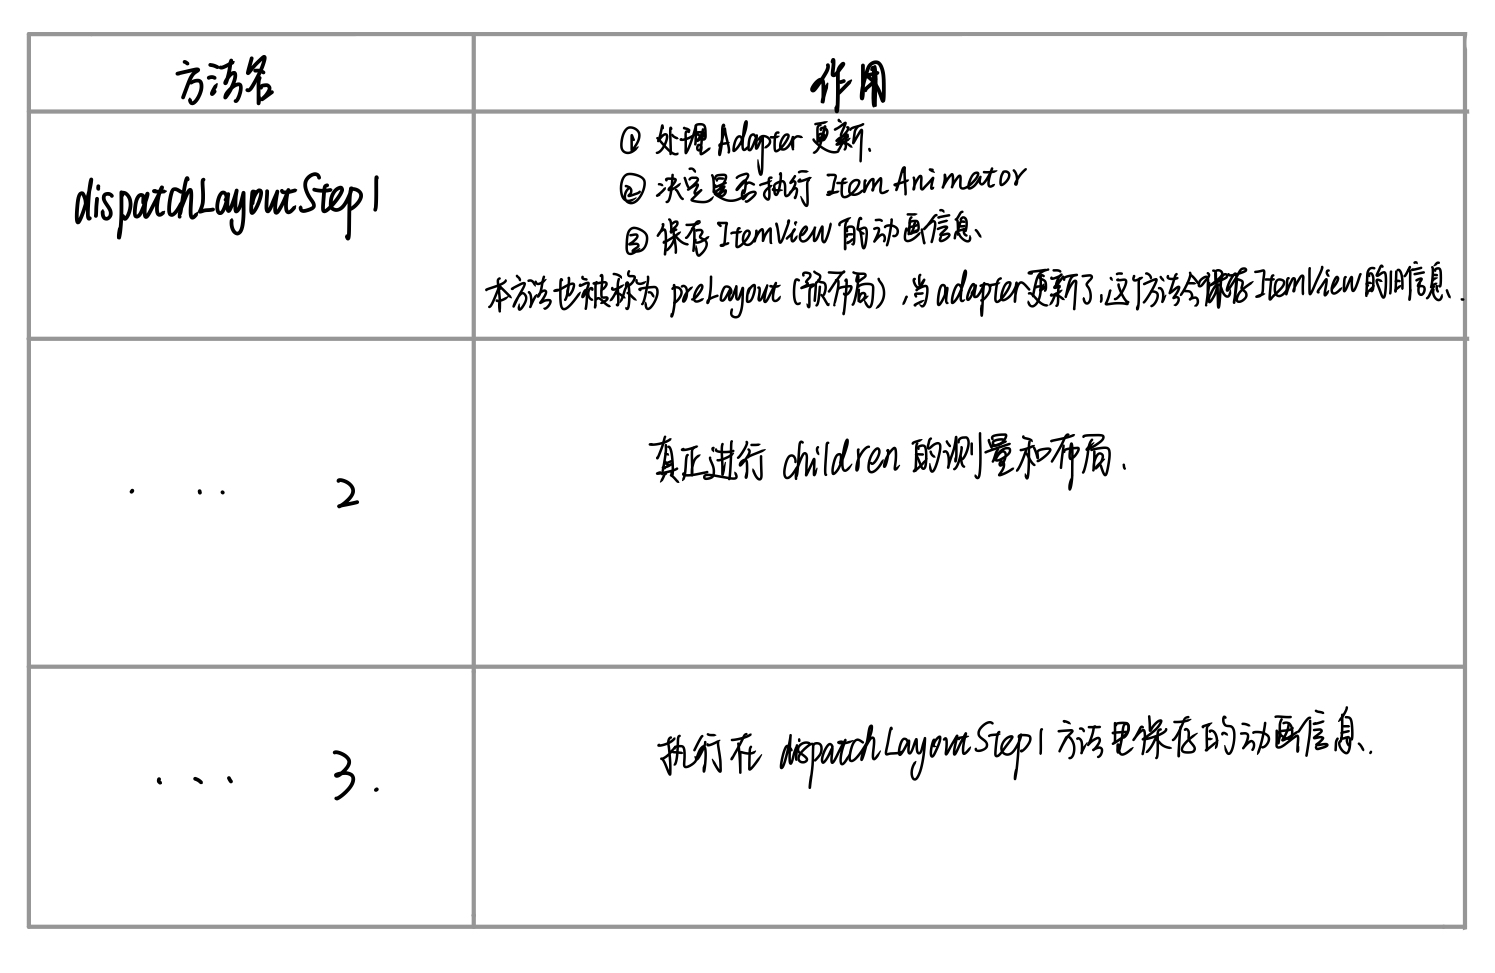
我们看一下dispatchLayout方法。

1
2
3
4
5
6
7
8
9
10
11
12
13
14
15
16
17
18
19
20
21
22
23
24
25
26
27
28
void dispatchLayout() {
if (mAdapter == null) {
Log.e(TAG, "No adapter attached; skipping layout");
// leave the state in START
return;
}
if (mLayout == null) {
Log.e(TAG, "No layout manager attached; skipping layout");
// leave the state in START
return;
}
mState.mIsMeasuring = false;
if (mState.mLayoutStep == State.STEP_START) {
dispatchLayoutStep1();
mLayout.setExactMeasureSpecsFrom(this);
dispatchLayoutStep2();
} else if (mAdapterHelper.hasUpdates() || mLayout.getWidth() != getWidth()
|| mLayout.getHeight() != getHeight()) {
// First 2 steps are done in onMeasure but looks like we have to run again due to
// changed size.
mLayout.setExactMeasureSpecsFrom(this);
dispatchLayoutStep2();
} else {
// always make sure we sync them (to ensure mode is exact)
mLayout.setExactMeasureSpecsFrom(this);
}
dispatchLayoutStep3();
}

这个方法里,分别判断了mAdaptermLayout,只要其中一个为null,则直接返回。注意到当mLayout为null时,即RecyclerView没有设置LayoutManager时,dispatchLayout方法直接返回了,因此不会处理layout过程,RecyclerView不会加载数据。

这个方法中保证了RecyclerView必须经历的三个过程,即dispatchLayoutStep1dispatchLayoutStep2dispatchLayoutStep3

前两个已经介绍过,我们来看dispatchLayoutStep3方法。

1
2
3
4
5
private void dispatchLayoutStep3() {
// ······
mState.mLayoutStep = State.STEP_START;
// ······
}

它将mState.mLayoutStep重置为了State.STEP_START。就是说下一次重新开始dispatchLayout时,也会经历3个方法。

方法的其他部分主要是做Item的动画,我们不再关注。

onDraw

1
2
3
4
5
6
7
8
9
10
11
12
@Override
public void onDraw(Canvas c) {
// 1
super.onDraw(c);
// 2
final int count = mItemDecorations.size();
for (int i = 0; i < count; i++) {
mItemDecorations.get(i).onDraw(c, this, mState);
}
// 3
// ...
}

RecyclerView的draw流程分为三步:

  • 调用super.draw方法。这里主要做两件事:1.将children的绘制分发给ViewGroup。2.将分割线的绘制分发给ItemDecoration
  • 如果需要的话,调用ItemDecorationonDrawOver方法。通过这个方法,我们在每个Item上自定义一些装饰。
  • 如果RecyclerView调用了setClipToPadding,会实现一种特殊的滑动效果——每个ItemView可以滑动到padding区域。

复用及缓存机制

RecyclerView在大量数据时依然可以丝滑般顺畅的滑动,这得益于它优秀的缓存机制。

我们知道,RecyclerView本身是一个ViewGroup,因此在滑动时就避免不了添加或移除子View(子View通过RecyclerView#Adapter中的onCreateViewHolder创建),如果每次使用子View都要去重新创建,肯定会影响滑动的流畅性,所以RecyclerView通过Recycler来缓存的是ViewHolder(内部包含子View),这样在滑动时可以复用子View,某些条件下还可以复用子View绑定的数据。所以本质上来说,RecyclerView之所以能够实现顺畅的滑动效果,是因为缓存机制,因为缓存减少了重复绘制View和绑定数据的时间,从而提高了滑动时的性能。

缓存

四级缓存

Recycler缓存ViewHolder对象有4个等级,优先级从高到底依次为:

  • mAttachedScrap:缓存屏幕中可见范围的ViewHolder;
  • mCachedViews:缓存滑动时即将与RecyclerView分离的ViewHolder,默认最大2个;
  • ViewCacheExtension:自定义实现的缓存;
  • RecycledViewPool :ViewHolder缓存池,可以支持不同的ViewType;
1.1 mAttachedScrap

mAttachedScrap存储的是当前屏幕中的ViewHolder,mAttachedScrap的对应数据结构是ArrayList,在调用LayoutManager#onLayoutChildren方法时对views进行布局,此时会将RecyclerView上的Views全部暂存到该集合中,该缓存中的ViewHolder的特性是,如果和RV上的position或者itemId匹配上了那么可以直接拿来使用的,无需调用onBindViewHolder方法。

1.2 mChangedScrap

mChangedScrap和mAttachedScrap属于同一级别的缓存,不过mChangedScrap的调用场景是notifyItemChanged和notifyItemRangeChanged,只有发生变化的ViewHolder才会放入到mChangedScrap中。mChangedScrap缓存中的ViewHolder是需要调用onBindViewHolder方法重新绑定数据的。

2.mCachedViews

mCachedViews缓存滑动时即将与RecyclerView分离的ViewHolder,按子View的position或id缓存,默认最多存放2个。mCachedViews对应的数据结构是ArrayList,但是该缓存对集合的大小是有限制的。

该缓存中ViewHolder的特性和mAttachedScrap中的特性是一样的,只要position或者itemId对应就无需重新绑定数据。开发者可以调用setItemViewCacheSize(size)方法来改变缓存的大小,该层级缓存触发的一个常见的场景是滑动RecyclerView。当然调用notify()也会触发该缓存。

3.ViewCacheExtension

ViewCacheExtension是需要开发者自己实现的缓存,基本上页面上的所有数据都可以通过它进行实现。

4. RecyclerViewPool

ViewHolder缓存池,本质上是一个SparseArray,其中key是ViewType(int类型),value存放的是 ArrayList< ViewHolder>,默认每个ArrayList中最多存放5个ViewHolder。

四级缓存对比

调用过程

RecyclerView滑动时会触发onTouchEvent#onMove,回收及复用ViewHolder在这里就会开始。我们知道设置RecyclerView时需要设置LayoutManager,LayoutManager负责RecyclerView的布局,包含对ItemView的获取与复用。以LinearLayoutManager为例,当RecyclerView重新布局时会依次执行下面几个方法:

  • onLayoutChildren():对RecyclerView进行布局的入口方法
  • fill(): 负责对剩余空间不断地填充,调用的方法是layoutChunk()
  • layoutChunk():负责填充View,该View最终是通过在缓存类Recycler中找到合适的View的

上述的整个调用链:onLayoutChildren()->fill()->layoutChunk()->next()->getViewForPosition()。getViewForPosition()即是是从RecyclerView的回收机制实现类Recycler中获取合适的View。

复用过程

RecyclerView对ViewHolder的复用是从LayoutState的next()方法开始的。LayoutManager在布局itemView时,需要获取一个ViewHolder对象,如下所示。

1
2
3
4
5
6
7
8
View next(RecyclerView.Recycler recycler) {
if (mScrapList != null) {
return nextViewFromScrapList();
}
final View view = recycler.getViewForPosition(mCurrentPosition);
mCurrentPosition += mItemDirection;
return view;
}

next方法调用RecyclerView的getViewForPosition方法来获取一个View,而getViewForPosition方法最终会调用到RecyclerView的tryGetViewHolderForPositionByDeadline方法,而RecyclerView真正复用的核心就在这里。

1
2
3
4
5
6
7
8
9
10
11
12
13
14
15
16
17
18
19
20
21
22
23
24
25
26
27
28
29
30
31
32
33
34
35
36
37
38
39
40
    @Nullable
ViewHolder tryGetViewHolderForPositionByDeadline(int position, boolean dryRun, long deadlineNs) {
ViewHolder holder = null;
// 0) 如果它是改变的废弃的ViewHolder,在scrap的mChangedScrap找
if (mState.isPreLayout()) {
holder = getChangedScrapViewForPosition(position);
fromScrapOrHiddenOrCache = holder != null;
}
// 1)根据position分别在scrap的mAttachedScrap、mChildHelper、mCachedViews中查找
if (holder == null) {
holder = getScrapOrHiddenOrCachedHolderForPosition(position, dryRun);
}

if (holder == null) {
final int type = mAdapter.getItemViewType(offsetPosition);
// 2)根据id在scrap的mAttachedScrap、mCachedViews中查找
if (mAdapter.hasStableIds()) {
holder = getScrapOrCachedViewForId(mAdapter.getItemId(offsetPosition), type, dryRun);
}
if (holder == null && mViewCacheExtension != null) {
//3)在ViewCacheExtension中查找,一般不用到,所以没有缓存
final View view = mViewCacheExtension
.getViewForPositionAndType(this, position, type);
if (view != null) {
holder = getChildViewHolder(view);
}
}
//4)在RecycledViewPool中查找
holder = getRecycledViewPool().getRecycledView(type);
if (holder != null) {
holder.resetInternal();
if (FORCE_INVALIDATE_DISPLAY_LIST) {
invalidateDisplayListInt(holder);
}
}
}
//5)到最后如果还没有找到复用的ViewHolder,则新建一个
holder = mAdapter.createViewHolder(RecyclerView.this, type);
}

可以看到,tryGetViewHolderForPositionByDeadline()方法分别去scrap、CacheView、ViewCacheExtension、RecycledViewPool中获取ViewHolder,如果没有则创建一个新的ViewHolder。

1.getChangedScrapViewForPosition

一般情况下,当我们调用adapter的notifyItemChanged()方法,数据发生变化时,item缓存在mChangedScrap中,后续拿到的ViewHolder需要重新绑定数据。此时查找ViewHolder就会通过position和id分别在scrap的mChangedScrap中查找。

1
2
3
4
5
6
7
8
9
10
11
12
13
14
15
16
17
ViewHolder getChangedScrapViewForPosition(int position) {
//通过position
for (int i = 0; i < changedScrapSize; i++) {
final ViewHolder holder = mChangedScrap.get(i);
return holder;
}
// 通过id
if (mAdapter.hasStableIds()) {
final long id = mAdapter.getItemId(offsetPosition);
for (int i = 0; i < changedScrapSize; i++) {
final ViewHolder holder = mChangedScrap.get(i);
return holder;
}
}
return null;
}

2.getScrapOrHiddenOrCachedHolderForPosition

如果没有找到视图,根据position分别在scrap的mAttachedScrap、mChildHelper、mCachedViews中查找,涉及的方法如下。

1
2
3
4
5
6
7
8
9
10
11
12
13
14
15
16
17
18
19
20
21
22
23
24
25
ViewHolder getScrapOrHiddenOrCachedHolderForPosition(int position, boolean dryRun) {
final int scrapCount = mAttachedScrap.size();

// 首先从mAttachedScrap中查找,精准匹配有效的ViewHolder
for (int i = 0; i < scrapCount; i++) {
final ViewHolder holder = mAttachedScrap.get(i);
return holder;
}
//接着在mChildHelper中mHiddenViews查找隐藏的ViewHolder
if (!dryRun) {
View view = mChildHelper.findHiddenNonRemovedView(position);
if (view != null) {
final ViewHolder vh = getChildViewHolderInt(view);
scrapView(view);
return vh;
}
}
//最后从我们的一级缓存中mCachedViews查找。
final int cacheSize = mCachedViews.size();
for (int i = 0; i < cacheSize; i++) {
final ViewHolder holder = mCachedViews.get(i);
return holder;
}
}

可以看到,getScrapOrHiddenOrCachedHolderForPosition查找ViewHolder的顺序如下:

  • 首先,从mAttachedScrap中查找,精准匹配有效的ViewHolder;
  • 接着,在mChildHelper中mHiddenViews查找隐藏的ViewHolder;
  • 最后,从一级缓存中mCachedViews查找。

3.getScrapOrCachedViewForId

通过id在scrap的mAttachedScrap、mCachedViews中查找。

1
2
3
4
5
6
7
8
9
10
11
12
13
14
15
16
ViewHolder getScrapOrCachedViewForId(long id, int type, boolean dryRun) {
//在Scrap的mAttachedScrap中查找
final int count = mAttachedScrap.size();
for (int i = count - 1; i >= 0; i--) {
final ViewHolder holder = mAttachedScrap.get(i);
return holder;
}

//在一级缓存mCachedViews中查找
final int cacheSize = mCachedViews.size();
for (int i = cacheSize - 1; i >= 0; i--) {
final ViewHolder holder = mCachedViews.get(i);
return holder;
}
}

getScrapOrCachedViewForId()方法查找的顺序如下:

  • 首先, 从mAttachedScrap中查找,精准匹配有效的ViewHolder;
  • 接着, 从一级缓存中mCachedViews查找;

4.mViewCacheExtension

mViewCacheExtension是由开发者定义的一层缓存策略,Recycler并没有将任何view缓存到这里。

1
2
3
4
5
6
if (holder == null && mViewCacheExtension != null) {
final View view = mViewCacheExtension.getViewForPositionAndType(this, position, type);
if (view != null) {
holder = getChildViewHolder(view);
}
}

如果这里没有自定义缓存策略,那么就找不到对应的view。

5.RecycledViewPool

它是通过itemType把ViewHolder的List缓存到SparseArray中的,在getRecycledViewPool().getRecycledView(type)根据itemType从SparseArray获取ScrapData ,然后再从里面获取ArrayList<ViewHolder>,从而获取到ViewHolder。

1
2
3
4
5
6
7
8
9
10
11
12
13
14
@Nullable
public ViewHolder getRecycledView(int viewType) {
final ScrapData scrapData = mScrap.get(viewType);//根据viewType获取对应的ScrapData
if (scrapData != null && !scrapData.mScrapHeap.isEmpty()) {
final ArrayList<ViewHolder> scrapHeap = scrapData.mScrapHeap;
for (int i = scrapHeap.size() - 1; i >= 0; i--) {
if (!scrapHeap.get(i).isAttachedToTransitionOverlay()) {
return scrapHeap.remove(i);
}
}
}
return null;
}

6.创建新的ViewHolder

如果还没有获取到ViewHolder,则通过mAdapter.createViewHolder()创建一个新的ViewHolder返回。

1
2
// 如果还没有找到复用的ViewHolder,则新建一个
holder = mAdapter.createViewHolder(RecyclerView.this, type);

下面是寻找ViewHolder的一个完整的流程图:

回收流程

RecyclerView回收的入口有很多, 但是不管怎么样操作,RecyclerView 的回收或者复用必然涉及到add View 和 remove View 操作, 所以我们从onLayout的流程入手分析回收和复用的机制。

首先,在LinearLayoutManager中,我们来到itemView布局入口的方法onLayoutChildren()

1
2
3
4
5
6
7
8
9
10
11
12
13
14
15
16
17
@Override
public void onLayoutChildren(RecyclerView.Recycler recycler, RecyclerView.State state) {
if (mPendingSavedState != null || mPendingScrollPosition != RecyclerView.NO_POSITION) {
if (state.getItemCount() == 0) {
removeAndRecycleAllViews(recycler);//移除所有子View
return;
}
}
ensureLayoutState();
mLayoutState.mRecycle = false;//禁止回收
//颠倒绘制布局
resolveShouldLayoutReverse();
onAnchorReady(recycler, state, mAnchorInfo, firstLayoutDirection);

//暂时分离已经附加的view,即将所有child detach并通过Scrap回收
detachAndScrapAttachedViews(recycler);
}

在onLayoutChildren()布局的时候,先根据实际情况是否需要removeAndRecycleAllViews()移除所有的子View,哪些ViewHolder不可用;然后通过detachAndScrapAttachedViews()暂时分离已经附加的ItemView,并缓存到List中。

detachAndScrapAttachedViews()的作用就是把当前屏幕所有的item与屏幕分离,将他们从RecyclerView的布局中拿下来,保存到list中,在重新布局时,再将ViewHolder重新一个个放到新的位置上去。

将屏幕上的ViewHolder从RecyclerView的布局中拿下来后,存放在Scrap中,Scrap包括mAttachedScrap和mChangedScrap,它们是一个list,用来保存从RecyclerView布局中拿下来ViewHolder列表,detachAndScrapAttachedViews()只会在onLayoutChildren()中调用,只有在布局的时候,才会把ViewHolder detach掉,然后再add进来重新布局,但是大家需要注意,Scrap只是保存从RecyclerView布局中当前屏幕显示的item的ViewHolder,不参与回收复用,单纯是为了现从RecyclerView中拿下来再重新布局上去。对于没有保存到的item,会放到mCachedViews或者RecycledViewPool缓存中参与回收复用。

1
2
3
4
5
6
7
8
public void detachAndScrapAttachedViews(@NonNull Recycler recycler) {
final int childCount = getChildCount();
for (int i = childCount - 1; i >= 0; i--) {
final View v = getChildAt(i);
scrapOrRecycleView(recycler, i, v);
}
}

遍历所有view,分离所有已经添加到RecyclerView的itemView。

1
2
3
4
5
6
7
8
9
10
11
12
private void scrapOrRecycleView(Recycler recycler, int index, View view) {
final ViewHolder viewHolder = getChildViewHolderInt(view);
if (viewHolder.isInvalid() && !viewHolder.isRemoved()
&& !mRecyclerView.mAdapter.hasStableIds()) {
removeViewAt(index);//移除VIew
recycler.recycleViewHolderInternal(viewHolder);//缓存到CacheView或者RecycledViewPool中
} else {
detachViewAt(index);//分离View
recycler.scrapView(view);//scrap缓存
mRecyclerView.mViewInfoStore.onViewDetached(viewHolder);
}
}

detachViewAt()方法分离视图,再通过scrapView()缓存到scrap中。

1
2
3
4
5
6
7
8
9
10
11
12
13
14
15
void scrapView(View view) {
final ViewHolder holder = getChildViewHolderInt(view);
if (holder.hasAnyOfTheFlags(ViewHolder.FLAG_REMOVED | ViewHolder.FLAG_INVALID)
|| !holder.isUpdated() || canReuseUpdatedViewHolder(holder)) {
holder.setScrapContainer(this, false);
mAttachedScrap.add(holder);//保存到mAttachedScrap中
} else {
if (mChangedScrap == null) {
mChangedScrap = new ArrayList<ViewHolder>();
}
holder.setScrapContainer(this, true);
mChangedScrap.add(holder);//保存到mChangedScrap中
}
}

回到scrapOrRecycleView()方法中,进入if()分支。如果viewHolder是无效、未被移除、未被标记的则放到recycleViewHolderInternal()缓存起来,同时removeViewAt()移除了viewHolder。

1
2
3
4
5
6
7
8
9
10
11
12
13
14
15
16
17
18
19
20
21
22
23
24
25
void recycleViewHolderInternal(ViewHolder holder) {
·····
if (forceRecycle || holder.isRecyclable()) {
if (mViewCacheMax > 0
&& !holder.hasAnyOfTheFlags(ViewHolder.FLAG_INVALID
| ViewHolder.FLAG_REMOVED
| ViewHolder.FLAG_UPDATE
| ViewHolder.FLAG_ADAPTER_POSITION_UNKNOWN)) {

int cachedViewSize = mCachedViews.size();
if (cachedViewSize >= mViewCacheMax && cachedViewSize > 0) {//如果超出容量限制,把第一个移除
recycleCachedViewAt(0);
cachedViewSize--;
}
·····
mCachedViews.add(targetCacheIndex, holder);//mCachedViews回收
cached = true;
}
if (!cached) {
addViewHolderToRecycledViewPool(holder, true);//放到RecycledViewPool回收
recycled = true;
}
}
}

如果符合条件,会优先缓存到mCachedViews中时,如果超出了mCachedViews的最大限制,通过recycleCachedViewAt()将CacheView缓存的第一个数据添加到终极回收池RecycledViewPool后再移除掉,最后才会add()新的ViewHolder添加到mCachedViews中。

剩下不符合条件的则通过addViewHolderToRecycledViewPool()缓存到RecycledViewPool中。

1
2
3
4
5
6
7
8
void addViewHolderToRecycledViewPool(@NonNull ViewHolder holder, boolean dispatchRecycled) {
clearNestedRecyclerViewIfNotNested(holder);
View itemView = holder.itemView;
······
holder.mOwnerRecyclerView = null;
getRecycledViewPool().putRecycledView(holder);//将holder添加到RecycledViewPool中
}

在填充布局调用fill()方法的时候,它会回收移出屏幕的view到mCachedViews或者RecycledViewPool中。

1
2
3
4
5
6
7
int fill(RecyclerView.Recycler recycler, LayoutState layoutState,
RecyclerView.State state, boolean stopOnFocusable) {
if (layoutState.mScrollingOffset != LayoutState.SCROLLING_OFFSET_NaN) {
recycleByLayoutState(recycler, layoutState);//回收移出屏幕的view
}
}

而recycleByLayoutState()方法就是用来回收移出屏幕的view。