View的工作流程指的就是measure、layout和draw。其中measure用来测量VIew的宽和高,layout用来确定View的位置,draw用来绘制View。
Acitivity启动过程 startActivityForResult方法 先从Activity的startActivity方法说起。
startActivity方法或startActivityForResult有很多种重载方式,但它们最终都会调用startActivityForResult(intent, requestCode, options)方法。源码如下:
1
2
3
4
5
6
7
8
9
10
11
12
13
14
15
16
17
18
19
20
21
22
23
24
25
26
27
28
29
30
31
32
public void startActivityForResult (@RequiresPermission Intent intent, int requestCode, @Nullable Bundle options) if (mParent == null ) { options = transferSpringboardActivityOptions(options); Instrumentation.ActivityResult ar = mInstrumentation.execStartActivity( this , mMainThread.getApplicationThread(), mToken, this , intent, requestCode, options); if (ar != null ) { mMainThread.sendActivityResult( mToken, mEmbeddedID, requestCode, ar.getResultCode(),ar.getResultData()); } if (requestCode >= 0 ) { mStartedActivity = true ; } cancelInputsAndStartExitTransition(options); } else { if (options != null ) { mParent.startActivityFromChild(this , intent, requestCode, options); } else { mParent.startActivityFromChild(this , intent, requestCode); } } }
Instrumentation的execStartActivity方法 我们来看一看第一次执行时调用的Instrumentation的execStartActivity(Context who, IBinder contextThread, IBinder token, Activity target, Intent intent, int requestCode, Bundle options)方法。
1 2 3 4 5 6 7 8 9 10 11 12 13 14 15 16 17 18 19 20 21 22 @UnsupportedAppUsage public ActivityResult execStartActivity ( Context who, IBinder contextThread, IBinder token, Activity target, Intent intent, int requestCode, Bundle options) try { intent.migrateExtraStreamToClipData(who); intent.prepareToLeaveProcess(who); int result = ActivityTaskManager.getService() .startActivity(whoThread, who.getBasePackageName(), intent, intent.resolveTypeIfNeeded(who.getContentResolver()), token, target != null ? target.mEmbeddedID : null , requestCode, 0 , null , options); checkStartActivityResult(result, intent); } catch (RemoteException e) { throw new RuntimeException("Failure from system" , e); } return null ; }
ActivityTaskManager.getService()方法得到的是 IActivityTaskManager 接口,它是通过进程间通讯(Inter-Process Communication,即IPC) 调用的,IActivityTaskManager 的服务端 是ActivityTaskManagerService ,所以最终是调用ActivityTaskManagerService 的startActivity 方法,后面的调用过程,这里就不再详细地讲解,最后调用的是ActivityThread 类的**handleLaunchActivity(ActivityClientRecord r, PendingTransactionActions pendingActions, Intent customIntent)**方法,
调用的是ActivityThread 类的handleLaunchActivity方法 源码如下所示:
1
2
3
4
5
6
7
8
9
10
11
12
13
14
15
16
17
18
19
20
21
22
23
24
25
26
27
28
29
30
31
32
33
34
35
36
37
38
39
40
41
42
43
44
45
46
47
48
49
50
51
52
53
54
55
@Override public Activity handleLaunchActivity (ActivityClientRecord r, PendingTransactionActions pendingActions, Intent customIntent) unscheduleGcIdler(); mSomeActivitiesChanged = true ; if (r.profilerInfo != null ) { mProfiler.setProfiler(r.profilerInfo); mProfiler.startProfiling(); } handleConfigurationChanged(null , null ); if (localLOGV) Slog.v( TAG, "Handling launch of " + r); if (!ThreadedRenderer.sRendererDisabled && (r.activityInfo.flags & ActivityInfo.FLAG_HARDWARE_ACCELERATED) != 0 ) { HardwareRenderer.preload(); } WindowManagerGlobal.initialize(); GraphicsEnvironment.hintActivityLaunch(); final Activity a = performLaunchActivity(r, customIntent); if (a != null ) { r.createdConfig = new Configuration(mConfiguration); reportSizeConfigurations(r); if (!r.activity.mFinished && pendingActions != null ) { pendingActions.setOldState(r.state); pendingActions.setRestoreInstanceState(true ); pendingActions.setCallOnPostCreate(true ); } } else { try { ActivityTaskManager.getService() .finishActivity(r.token, Activity.RESULT_CANCELED, null , Activity.DONT_FINISH_TASK_WITH_ACTIVITY); } catch (RemoteException ex) { throw ex.rethrowFromSystemServer(); } } return a; }
1 2 3 4 5 6 7 8 9 10 11 12 13 14 15 16 17 18 19 20 21 22 23 24 25 26 27 28 29 30 31 32 33 34 35 36 37 38 39 40 41 42 43 44 45 46 47 48 49 50 51 52 53 54 55 56 57 58 59 60 61 62 63 64 65 66 67 68 69 70 71 72 73 74 75 76 77 78 79 80 81 82 83 84 85 86 87 88 89 90 91 92 93 94 95 96 97 98 99 100 101 102 private Activity performLaunchActivity (ActivityClientRecord r, Intent customIntent) ActivityInfo aInfo = r.activityInfo; if (r.packageInfo == null ) { r.packageInfo = getPackageInfo(aInfo.applicationInfo, r.compatInfo, Context.CONTEXT_INCLUDE_CODE); } ComponentName component = r.intent.getComponent(); if (component == null ) { component = r.intent.resolveActivity( mInitialApplication.getPackageManager()); r.intent.setComponent(component); } if (r.activityInfo.targetActivity != null ) { component = new ComponentName(r.activityInfo.packageName, r.activityInfo.targetActivity); } ContextImpl appContext = createBaseContextForActivity(r); Activity activity = null ; try { java.lang.ClassLoader cl = appContext.getClassLoader(); activity = mInstrumentation.newActivity( cl, component.getClassName(), r.intent); StrictMode.incrementExpectedActivityCount(activity.getClass()); r.intent.setExtrasClassLoader(cl); r.intent.prepareToEnterProcess(); if (r.state != null ) { r.state.setClassLoader(cl); } } catch (Exception e) { if (!mInstrumentation.onException(activity, e)) { throw new RuntimeException( "Unable to instantiate activity " + component + ": " + e.toString(), e); } } try { Application app = r.packageInfo.makeApplication(false , mInstrumentation); if (activity != null ) { appContext.getResources().addLoaders( app.getResources().getLoaders().toArray(new ResourcesLoader[0 ])); appContext.setOuterContext(activity); activity.attach(appContext, this , getInstrumentation(), r.token, r.ident, app, r.intent, r.activityInfo, title, r.parent, r.embeddedID, r.lastNonConfigurationInstances, config, r.referrer, r.voiceInteractor, window, r.configCallback, r.assistToken); if (r.isPersistable()) { mInstrumentation.callActivityOnCreate(activity, r.state, r.persistentState); } else { mInstrumentation.callActivityOnCreate(activity, r.state); } if (!activity.mCalled) { throw new SuperNotCalledException( "Activity " + r.intent.getComponent().toShortString() + " did not call through to super.onCreate()" ); } r.activity = activity; } r.setState(ON_CREATE); synchronized (mResourcesManager) { mActivities.put(r.token, r); } } catch (SuperNotCalledException e) { throw e; } catch (Exception e) { if (!mInstrumentation.onException(activity, e)) { throw new RuntimeException( "Unable to start activity " + component + ": " + e.toString(), e); } } return activity; }
performActivity通过反射机制创建了Activity的实例,并且构建了Application的实例。
调用了Activity的attach方法 1 2 3 4 5 6 7 8 9 10 11 12 13 14 15 16 17 18 19 20 21 22 23 24 25 26 27 28 @UnsupportedAppUsage final void attach (Context context, ActivityThread aThread, Instrumentation instr, IBinder token, int ident, Application application, Intent intent, ActivityInfo info, CharSequence title, Activity parent, String id, NonConfigurationInstances lastNonConfigurationInstances, Configuration config, String referrer, IVoiceInteractor voiceInteractor, Window window, ActivityConfigCallback activityConfigCallback, IBinder assistToken) mWindow = new PhoneWindow(this , window, activityConfigCallback); mWindow.setWindowControllerCallback(mWindowControllerCallback); mWindow.setCallback(this ); mWindow.setOnWindowDismissedCallback(this ); mWindow.getLayoutInflater().setPrivateFactory(this ); mWindow.setWindowManager( (WindowManager)context.getSystemService(Context.WINDOW_SERVICE), mToken, mComponent.flattenToString(), (info.flags & ActivityInfo.FLAG_HARDWARE_ACCELERATED) != 0 ); }
调用了Instrumentation对象的callActivityOnCreate方法 1 2 3 4 5 public void callActivityOnCreate (Activity activity, Bundle icicle,PersistableBundle persistentState) prePerformCreate(activity); activity.performCreate(icicle, persistentState); postPerformCreate(activity); }
1 2 3 4 5 6 7 8 9 10 11 final void performCreate (Bundle icicle, PersistableBundle persistentState) dispatchActivityPreCreated(icicle); mCanEnterPictureInPicture = true ; restoreHasCurrentPermissionRequest(icicle); if (persistentState != null ) { onCreate(icicle, persistentState); } else { onCreate(icicle); } ....... }
调用了创建好的Activity的onCreate方法,至此,Activity启动完成。 调用OnStart和OnResume执行绘制流程 接着前面的逻辑,接着就会调用ActivityThread 类的handleStartActivity(ActivityClientRecord r, PendingTransactionActions pendingActions)方法,然后 Activity 类的onStart 方法就会被调用,然后调用ActivityThread 类的**handleResumeActivity(IBinder token, boolean finalStateRequest, boolean isForward, String reason)**方法。
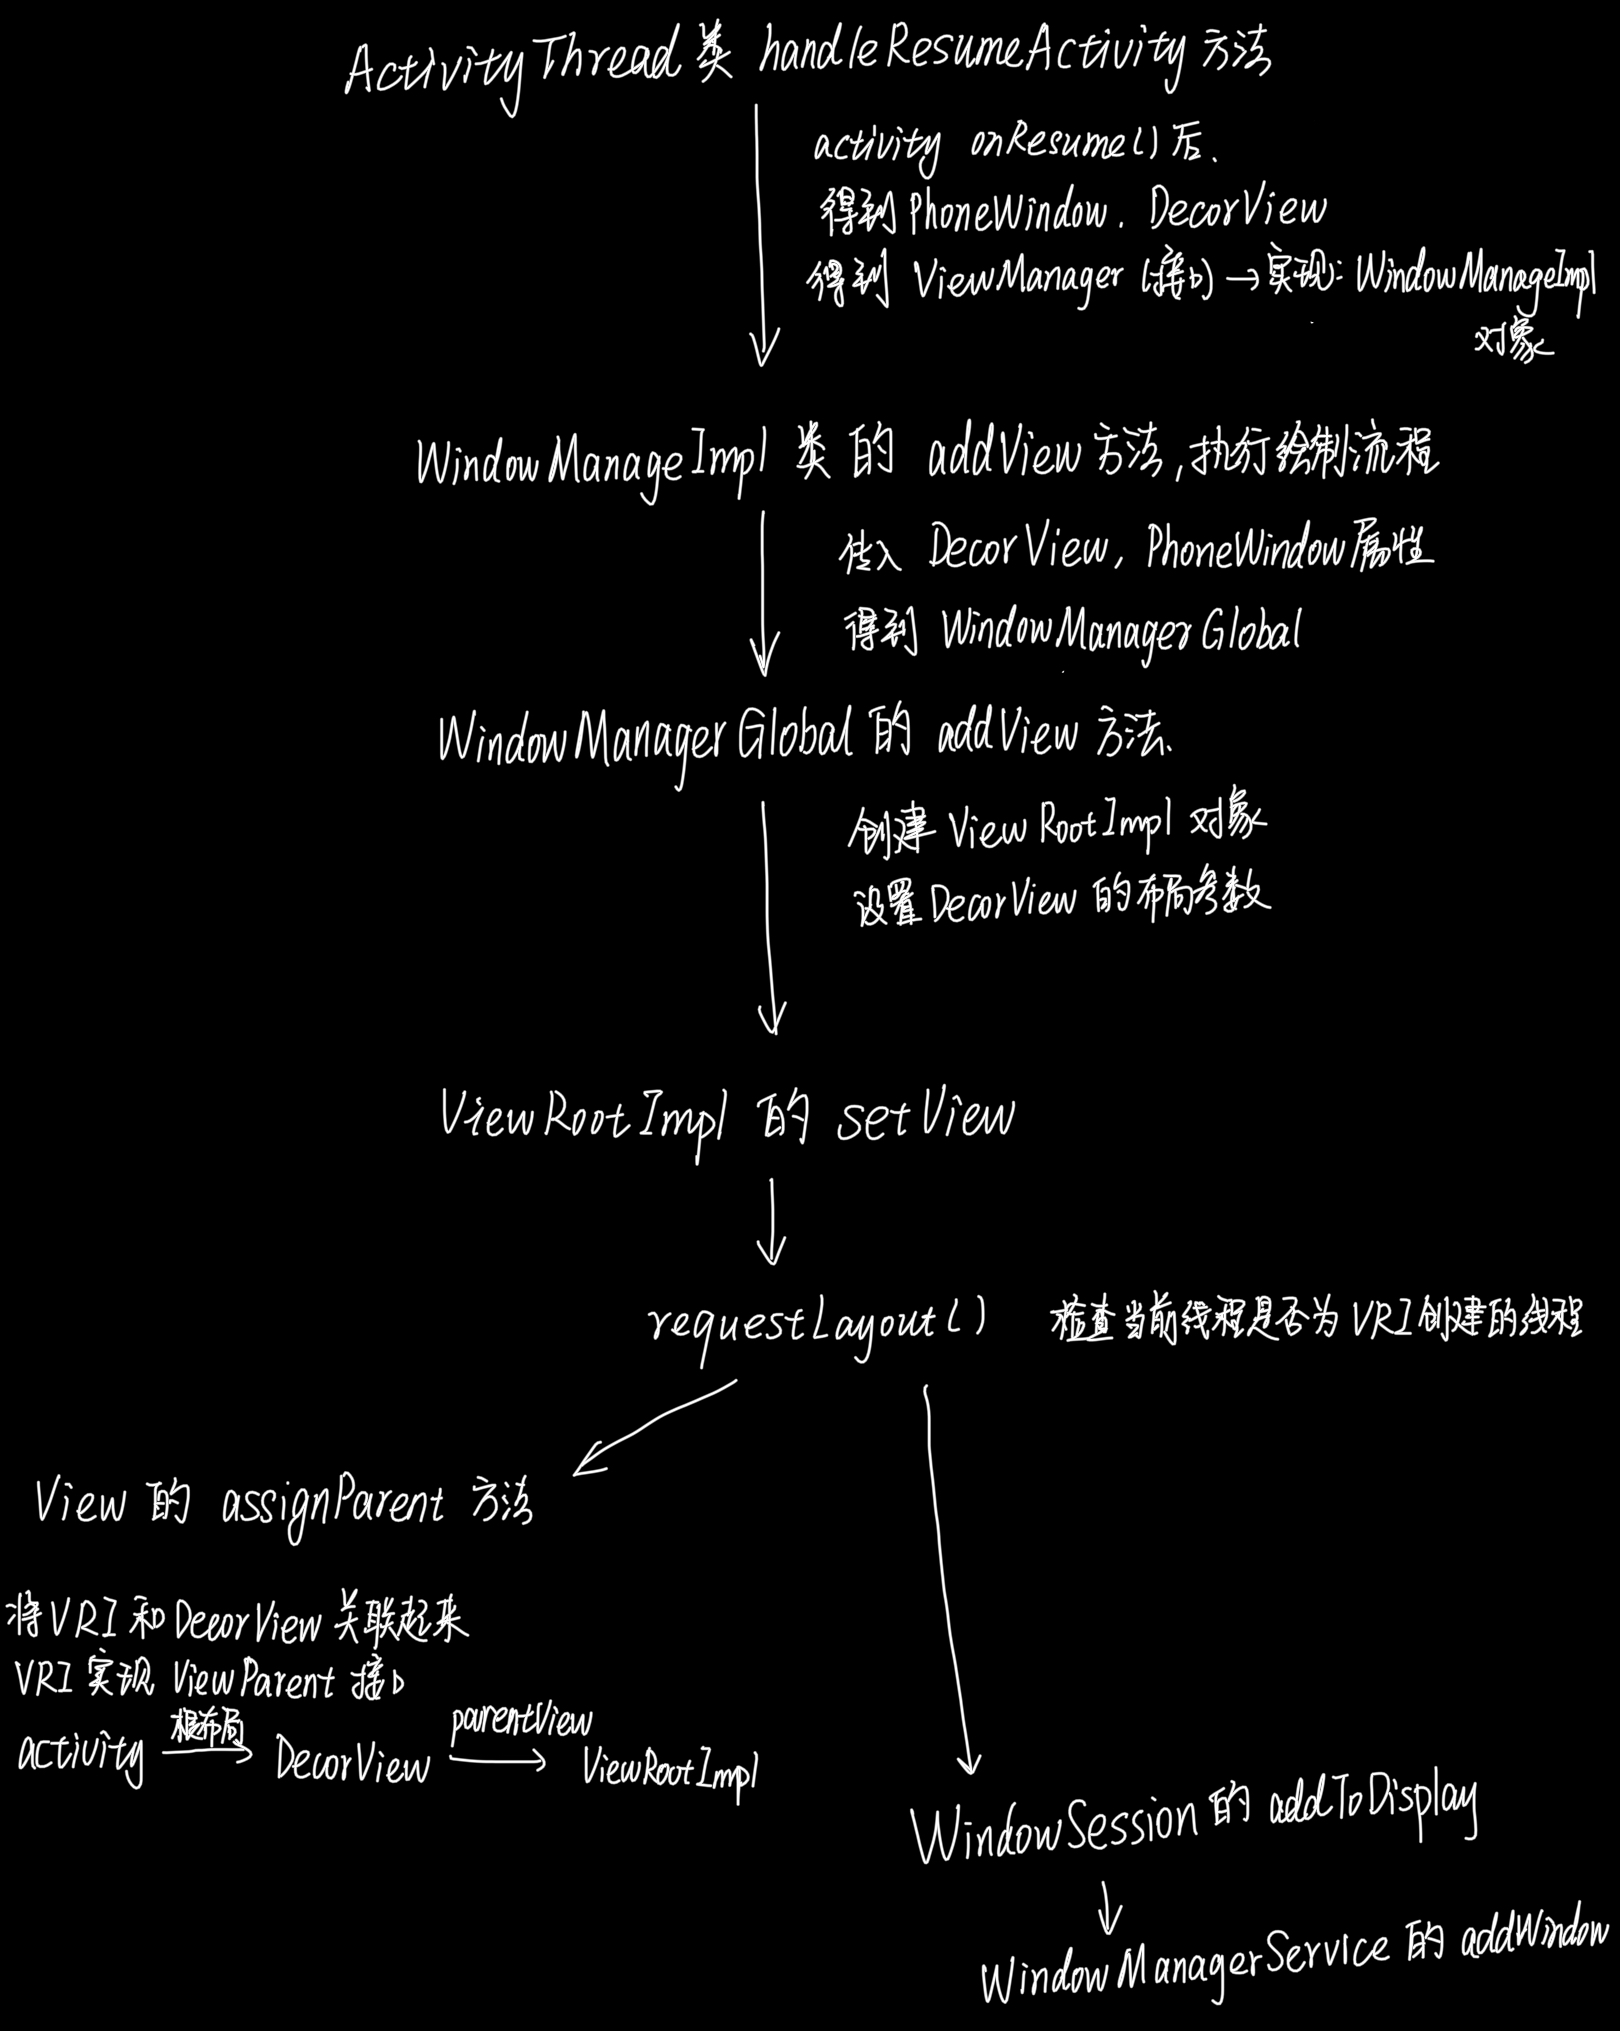
1 2 3 4 5 6 7 8 9 10 11 12 13 14 15 16 17 18 19 20 21 22 23 24 25 26 27 28 29 30 31 32 33 34 35 36 37 38 39 40 41 42 43 @Override public void handleResumeActivity (IBinder token, boolean finalStateRequest, boolean isForward, String reason) final ActivityClientRecord r = performResumeActivity(token, finalStateRequest, reason); final Activity a = r.activity; if (r.window == null && !a.mFinished && willBeVisible) { r.window = r.activity.getWindow(); View decor = r.window.getDecorView(); decor.setVisibility(View.INVISIBLE); ViewManager wm = a.getWindowManager(); WindowManager.LayoutParams l = r.window.getAttributes(); if (a.mVisibleFromClient) { if (!a.mWindowAdded) { a.mWindowAdded = true ; wm.addView(decor, l); } else { } } } else if (!willBeVisible) { if (localLOGV) Slog.v(TAG, "Launch " + r + " mStartedActivity set" ); r.hideForNow = true ; } }
ActivityThread#handleResumeActivity方法 首先调用performResumeActivity ,在performResumeActivity 完成之后在会调用WindowManager#addView向Window 中添加布局。 所以,实际上布局是在onResume 完成之后才被加载在PhoneWindow 中的,不过具体的内容我们还是需要看看performResumeActivity
1 2 3 4 5 6 7 8 9 10 11 12 13 14 15 16 17 18 19 20 21 22 23 24 25 26 27 28 29 public ActivityClientRecord performResumeActivity (IBinder token, boolean finalStateRequest, String reason) final ActivityClientRecord r = mActivities.get(token); if (r.getLifecycleState() == ON_RESUME) { if (!finalStateRequest) { } return null ; } try { r.activity.performResume(r.startsNotResumed, reason); r.state = null ; r.persistentState = null ; r.setState(ON_RESUME); reportTopResumedActivityChanged(r, r.isTopResumedActivity, "topWhenResuming" ); } catch (Exception e) { } return r; }
View的绘制流程 在Activity的onResume方法之后执行 调用WindowManagerImpl 类的addView方法 调用WindowManagerImpl 类的addView(View view, ViewGroup.LayoutParams params)方法分别传入了 DecorView 和PhoneWindow 的属性
1 2 3 4 5 6 7 8 9 10 11 12 13 public final class WindowManagerImpl implements WindowManager @UnsupportedAppUsage private final WindowManagerGlobal mGlobal = WindowManagerGlobal.getInstance(); @Override public void addView (@NonNull View view, @NonNull ViewGroup.LayoutParams params) applyDefaultToken(params); mGlobal.addView(view, params, mContext.getDisplayNoVerify(), mParentWindow,mContext.getUserId()); } }
调用了WindowManagerGlobal类的addView方法 1 2 3 4 5 6 7 8 9 10 11 12 13 14 15 16 17 18 19 20 21 22 23 24 25 26 27 28 29 30 31 32 33 34 35 36 37 38 39 public void addView (View view, ViewGroup.LayoutParams params, Display display, Window parentWindow) final WindowManager.LayoutParams wparams = (WindowManager.LayoutParams) params; ViewRootImpl root; View panelParentView = null ; synchronized (mLock) { root = new ViewRootImpl(view.getContext(), display); view.setLayoutParams(wparams); mViews.add(view); mRoots.add(root); mParams.add(wparams); try { root.setView(view, wparams, panelParentView); } catch (RuntimeException e) { if (index >= 0 ) { removeViewLocked(index, true ); } throw e; } } }
调用了ViewRootImpl类的setView方法 1 2 3 4 5 6 7 8 9 10 11 12 13 14 15 16 17 18 19 20 21 22 23 24 25 26 27 28 29 30 31 32 33 34 public void setView (View view, WindowManager.LayoutParams attrs, View panelParentView) synchronized (this ) { if (mView == null ) { mView = view; requestLayout(); try { mOrigWindowType = mWindowAttributes.type; mAttachInfo.mRecomputeGlobalAttributes = true ; collectViewAttributes(); adjustLayoutParamsForCompatibility(mWindowAttributes); res = mWindowSession.addToDisplayAsUser(mWindow, mSeq, mWindowAttributes, getHostVisibility(), mDisplay.getDisplayId(), userId, mTmpFrame, mAttachInfo.mContentInsets, mAttachInfo.mStableInsets, mAttachInfo.mDisplayCutout, inputChannel, mTempInsets, mTempControls); setFrame(mTmpFrame); } catch { } view.assignParent(this ); } } }
requestLayout方法 1 2 3 4 5 6 7 8 @Override public void requestLayout () if (!mHandlingLayoutInLayoutRequest) { checkThread(); mLayoutRequested = true ; scheduleTraversals(); } }
requestLayout()方法的作用是 检查当前线程是不是创建ViewRootImpl所在的线程 ,如果是就通知View执行绘制流程 ,否则就抛出CalledFromWrongThreadException异常
View的assignParent方法 1 2 3 4 5 6 7 8 9 10 11 12 13 14 15 @UnsupportedAppUsage void assignParent (ViewParent parent) if (mParent == null ) { mParent = parent; } else if (parent == null ) { mParent = null ; } else { throw new RuntimeException("view " + this + " being added, but" + " it already has a parent" ); } }
这个方法的作用是将ViewRootImpl和DecorView关联起来 ,这里传进来的是ViewRootImpl ,ViewRootImpl 实现ViewParent 接口,每一个Activity 的根布局 是DecorView ,DecorView 的parentView 是ViewRootImpl ,所以在子元素 中调用invalidate()方法这类的方法的时候,需要遍历找到 parentView ,最后都会调用ViewRootImpl 相关的方法。
setContentView方法 我们的Activity 类是继承AppCompatActivity 类.
Appcompat 最开始是出现在com.android.support:appcompat-v7 库中,它是为了让Android SDK 7(Android 2.1,即Android Eclair) 以上的设备可以使用ActionBar ,而在com.android.support:appcompat-v7:21 以上的库,AppCompat 可以为Android SDK 7(Android 2.1,即Android Eclair) 以上的设备带来Material Color Palette 、Widget着色 、Toolbar 等功能,并且用AppCompatActivity 替代ActionBarActivity ,在Android SDK 28(Android 9.0,即Android Pie) 发布后,appcompat 库都迁移到了AndroidX 库,AndroidX 库是Android Jetpack 组件。
AppCompatActivity 类的setContentView方法 。1 2 3 4 5 6 @Override public void setContentView (@LayoutRes int layoutResID) getDelegate().setContentView(layoutResID); }
getDelegate方法 1 2 3 4 5 6 7 8 9 10 @NonNull public AppCompatDelegate getDelegate () if (mDelegate == null ) { mDelegate = AppCompatDelegate.create(this , this ); } return mDelegate; }
AppCompatDelegate 抽象类的create 方法1 2 3 4 5 6 7 @NonNull public static AppCompatDelegate create (@NonNull Activity activity, @Nullable AppCompatCallback callback) return new AppCompatDelegateImpl(activity, callback); }
所以AppCompatDelegateImpl 类是继承AppCompatDelegate 抽象类。
AppCompatDelegateImpl的setContentView方法 1 2 3 4 5 6 7 8 9 10 11 12 13 14 @Override public void setContentView (int resId) ensureSubDecor(); ViewGroup contentParent = mSubDecor.findViewById(android.R.id.content); contentParent.removeAllViews(); LayoutInflater.from(mContext).inflate(resId, contentParent); mAppCompatWindowCallback.getWrapped().onContentChanged(); }
ensureSubDecor 方法1 2 3 4 5 6 7 8 9 10 11 12 13 14 15 16 17 18 19 20 21 22 23 24 25 26 27 28 29 30 31 32 33 34 private void ensureSubDecor () if (!mSubDecorInstalled) { mSubDecor = createSubDecor(); CharSequence title = getTitle(); if (!TextUtils.isEmpty(title)) { if (mDecorContentParent != null ) { mDecorContentParent.setWindowTitle(title); } else if (peekSupportActionBar() != null ) { peekSupportActionBar().setWindowTitle(title); } else if (mTitleView != null ) { mTitleView.setText(title); } } applyFixedSizeWindow(); onSubDecorInstalled(mSubDecor); mSubDecorInstalled = true ; PanelFeatureState st = getPanelState(FEATURE_OPTIONS_PANEL, false ); if (!mIsDestroyed && (st == null || st.menu == null )) { invalidatePanelMenu(FEATURE_SUPPORT_ACTION_BAR); } } }
作用是创建DecorView ,并且将其添加到Window中 ,同时创建面板菜单
createSubDecor 方法1 2 3 4 5 6 7 8 9 10 11 12 13 14 15 16 17 18 19 20 21 22 23 24 25 26 27 28 29 30 31 32 33 34 35 36 37 38 39 40 41 42 43 44 45 46 47 48 49 50 51 52 53 54 55 56 57 58 59 60 61 62 63 64 65 66 67 68 69 70 71 72 73 74 75 76 77 78 79 80 81 82 83 84 85 86 87 88 89 90 91 92 93 94 95 96 97 98 99 100 101 102 103 104 105 106 107 108 109 110 111 112 113 114 115 116 117 118 119 120 121 122 123 124 125 126 127 128 129 130 131 132 133 134 135 136 137 138 139 140 141 142 143 144 145 146 147 148 149 private ViewGroup createSubDecor () TypedArray a = mContext.obtainStyledAttributes(R.styleable.AppCompatTheme); if (!a.hasValue(R.styleable.AppCompatTheme_windowActionBar)) { a.recycle(); throw new IllegalStateException( "You need to use a Theme.AppCompat theme (or descendant) with this activity." ); } if (a.getBoolean(R.styleable.AppCompatTheme_windowNoTitle, false )) { requestWindowFeature(Window.FEATURE_NO_TITLE); } else if (a.getBoolean(R.styleable.AppCompatTheme_windowActionBar, false )) { requestWindowFeature(FEATURE_SUPPORT_ACTION_BAR); } if (a.getBoolean(R.styleable.AppCompatTheme_windowActionBarOverlay, false )) { requestWindowFeature(FEATURE_SUPPORT_ACTION_BAR_OVERLAY); } if (a.getBoolean(R.styleable.AppCompatTheme_windowActionModeOverlay, false )) { requestWindowFeature(FEATURE_ACTION_MODE_OVERLAY); } mIsFloating = a.getBoolean(R.styleable.AppCompatTheme_android_windowIsFloating, false ); a.recycle(); ensureWindow(); mWindow.getDecorView(); final LayoutInflater inflater = LayoutInflater.from(mContext); ViewGroup subDecor = null ; if (!mWindowNoTitle) { if (mIsFloating) { subDecor = (ViewGroup) inflater.inflate( R.layout.abc_dialog_title_material, null ); mHasActionBar = mOverlayActionBar = false ; } else if (mHasActionBar) { TypedValue outValue = new TypedValue(); mContext.getTheme().resolveAttribute(R.attr.actionBarTheme, outValue, true ); Context themedContext; if (outValue.resourceId != 0 ) { themedContext = new ContextThemeWrapper(mContext, outValue.resourceId); } else { themedContext = mContext; } subDecor = (ViewGroup) LayoutInflater.from(themedContext) .inflate(R.layout.abc_screen_toolbar, null ); mDecorContentParent = (DecorContentParent) subDecor .findViewById(R.id.decor_content_parent); mDecorContentParent.setWindowCallback(getWindowCallback()); if (mOverlayActionBar) { mDecorContentParent.initFeature(FEATURE_SUPPORT_ACTION_BAR_OVERLAY); } if (mFeatureProgress) { mDecorContentParent.initFeature(Window.FEATURE_PROGRESS); } if (mFeatureIndeterminateProgress) { mDecorContentParent.initFeature(Window.FEATURE_INDETERMINATE_PROGRESS); } } } else { if (mOverlayActionMode) { subDecor = (ViewGroup) inflater.inflate( R.layout.abc_screen_simple_overlay_action_mode, null ); } else { subDecor = (ViewGroup) inflater.inflate(R.layout.abc_screen_simple, null ); } } if (subDecor == null ) { throw new IllegalArgumentException( "AppCompat does not support the current theme features: { " + "windowActionBar: " + mHasActionBar + ", windowActionBarOverlay: " + mOverlayActionBar + ", android:windowIsFloating: " + mIsFloating + ", windowActionModeOverlay: " + mOverlayActionMode + ", windowNoTitle: " + mWindowNoTitle + " }" ); } if (mDecorContentParent == null ) { mTitleView = (TextView) subDecor.findViewById(R.id.title); } ViewUtils.makeOptionalFitsSystemWindows(subDecor); final ContentFrameLayout contentView = (ContentFrameLayout) subDecor.findViewById( R.id.action_bar_activity_content); final ViewGroup windowContentView = (ViewGroup) mWindow.findViewById(android.R.id.content); if (windowContentView != null ) { while (windowContentView.getChildCount() > 0 ) { final View child = windowContentView.getChildAt(0 ); windowContentView.removeViewAt(0 ); contentView.addView(child); } windowContentView.setId(View.NO_ID); contentView.setId(android.R.id.content); if (windowContentView instanceof FrameLayout) { ((FrameLayout) windowContentView).setForeground(null ); } } mWindow.setContentView(subDecor); contentView.setAttachListener(new ContentFrameLayout.OnAttachListener() { @Override public void onAttachedFromWindow () @Override public void onDetachedFromWindow () dismissPopups(); } }); return subDecor; }
参考文章及资料:
深入了解Android的View工作原理:https://www.jianshu.com/p/4361fe3cf287
Android UI体系知识&面试题: https://www.bilibili.com/read/cv13672159?spm_id_from=333.999.0.0